Veterinarian-Approved Techniques for Safe Home Dog Nail Trimming and Emergency Bleeding Treatment
- Understanding Dog Nail Anatomy: Why Proper Clipping Matters
- Essential Supplies for Dog Nail Clipping and Bleeding Emergencies
- Step-by-Step Guide: How to Safely Clip Your Dog’s Nails
- Emergency First Aid: How to Stop Dog Nail Bleeding Fast
- Treating Broken, Split, or Cracked Dog Nails
- Common Nail Trimming Mistakes to Avoid
- Professional Tips for Dogs with Black Nails
- Preventing Nail Injuries: Long-Term Maintenance
- Frequently Asked Questions About Dog Nail Clipping and Bleeding
- Building Confidence: Making Nail Trimming a Positive Experience
- When to Seek Professional Help
- Advanced Scenarios: Special Circumstances
- Conclusion: Empowering Pet Parents with Safe Nail Care
🔑 Key Takeaways
- Regular nail trimming every 3-4 weeks prevents painful overgrowth and broken nails
- Styptic powder is essential for stopping bleeding within minutes when you accidentally cut the quick
- Light-colored nails show the pink quick clearly, while dark nails require extra caution with smaller cuts
- Most nail bleeding emergencies can be safely treated at home with proper supplies
- Sharp, quality nail clippers prevent crushing and reduce the risk of painful injuries
Understanding Dog Nail Anatomy: Why Proper Clipping Matters
Before learning how to clip dog nails safely, understanding canine nail anatomy is crucial for preventing injuries and knowing how to respond when accidents happen.
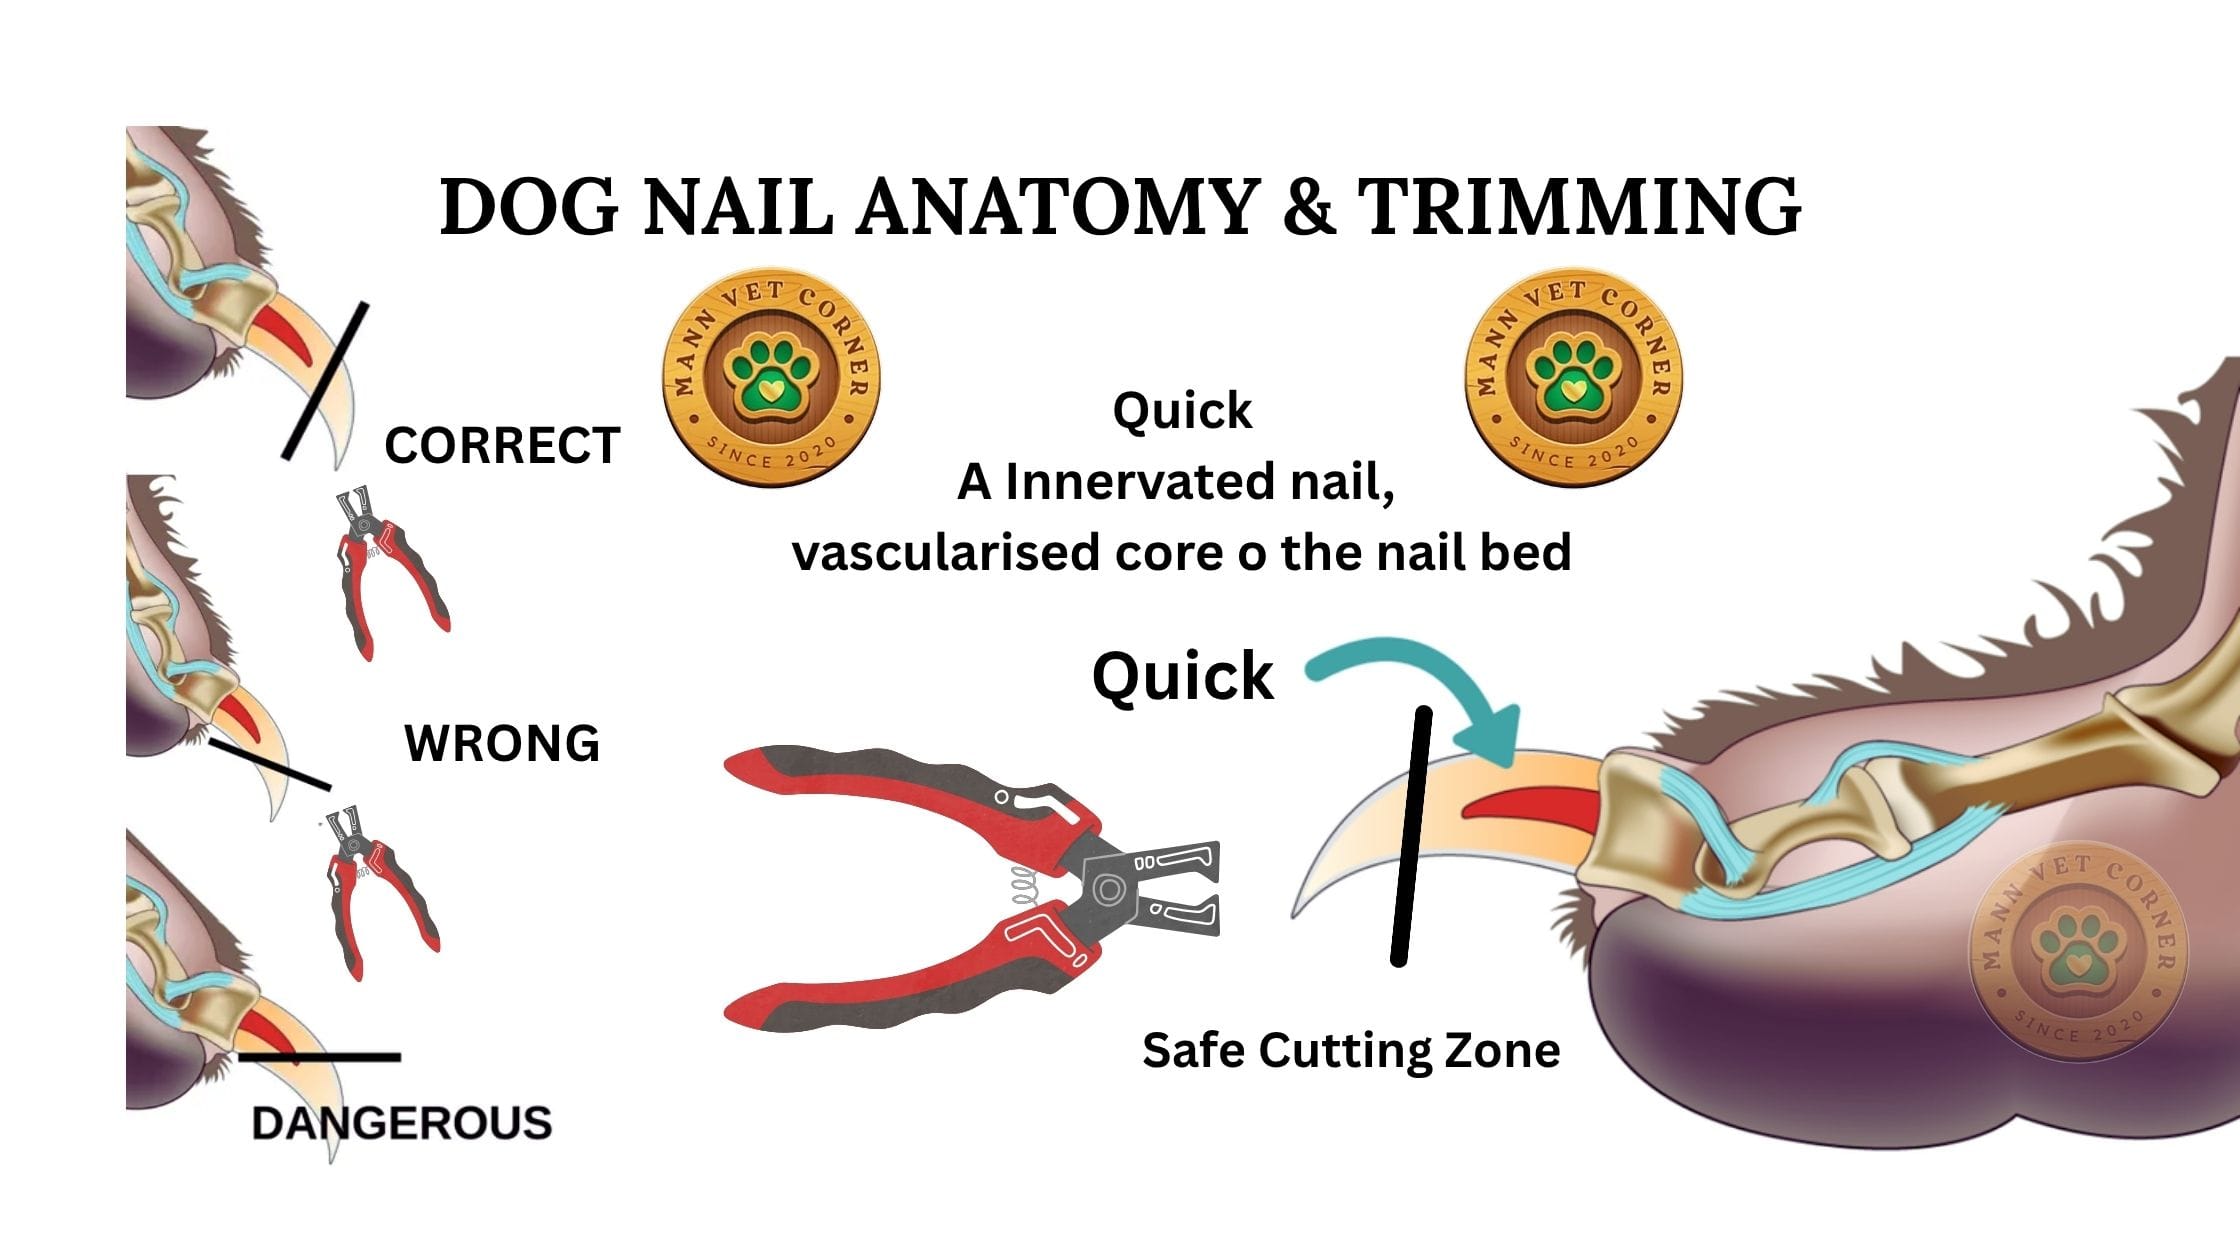
Dog toenails consist of two main parts. The hard outer shell is made of keratin, the same protein found in human nails. This protective layer surrounds the quick, a sensitive inner structure containing blood vessels and nerves. Unlike human nails, dog nails attach directly to the toe bones (phalanges), which means nail infections can potentially spread to the bone, making proper nail care essential for your dog’s health.
For dogs with clear or white nails, you can easily see the pink quick through the nail, making trimming straightforward. However, dogs with black or dark nails present a greater challenge since the quick remains invisible, requiring a more cautious approach to avoid cutting too deep.
Essential Supplies for Dog Nail Clipping and Bleeding Emergencies
Having the right tools prepared before you start makes nail trimming safer and less stressful for both you and your dog. Keep these supplies organized in a dedicated container for easy access.
✂️ Quality Nail Clippers
Invest in sharp, professional-grade dog nail clippers designed for your dog’s size. Dull trimmers crush the nail and cause unnecessary pain even without hitting the quick.
🩹 Styptic Powder
This clotting agent is your most important emergency supply. Brands like Kwik Stop instantly stop bleeding when applied directly to the nail.
🍖 High-Value Treats
Reward your dog throughout the process to create positive associations. Keep special treats reserved only for nail trimming sessions.
🧴 Gauze Pads & Bandages
Use clean gauze to apply pressure if bleeding occurs. Non-stick telfa pads work well for wrapping injured nails temporarily.
Step-by-Step Guide: How to Safely Clip Your Dog’s Nails
Follow these veterinarian-approved techniques to trim your dog’s nails safely and minimize the risk of cutting the quick.
1. Create a Calm Environment
Choose a quiet, well-lit area where your dog feels comfortable. Have all supplies within reach before bringing your dog to the grooming spot. If your dog is nervous, start with short sessions where you simply handle their paws and offer treats, building positive associations over several days.
2. Position Your Dog Properly
For small dogs, place them on a non-slip surface at a comfortable height. Larger dogs can stand or lie down. Hold the paw firmly but gently, pressing on the pad to extend the nail fully. Having a second person offer treats and calm reassurance makes the process much easier.
3. Identify the Quick
For Light-Colored Nails:
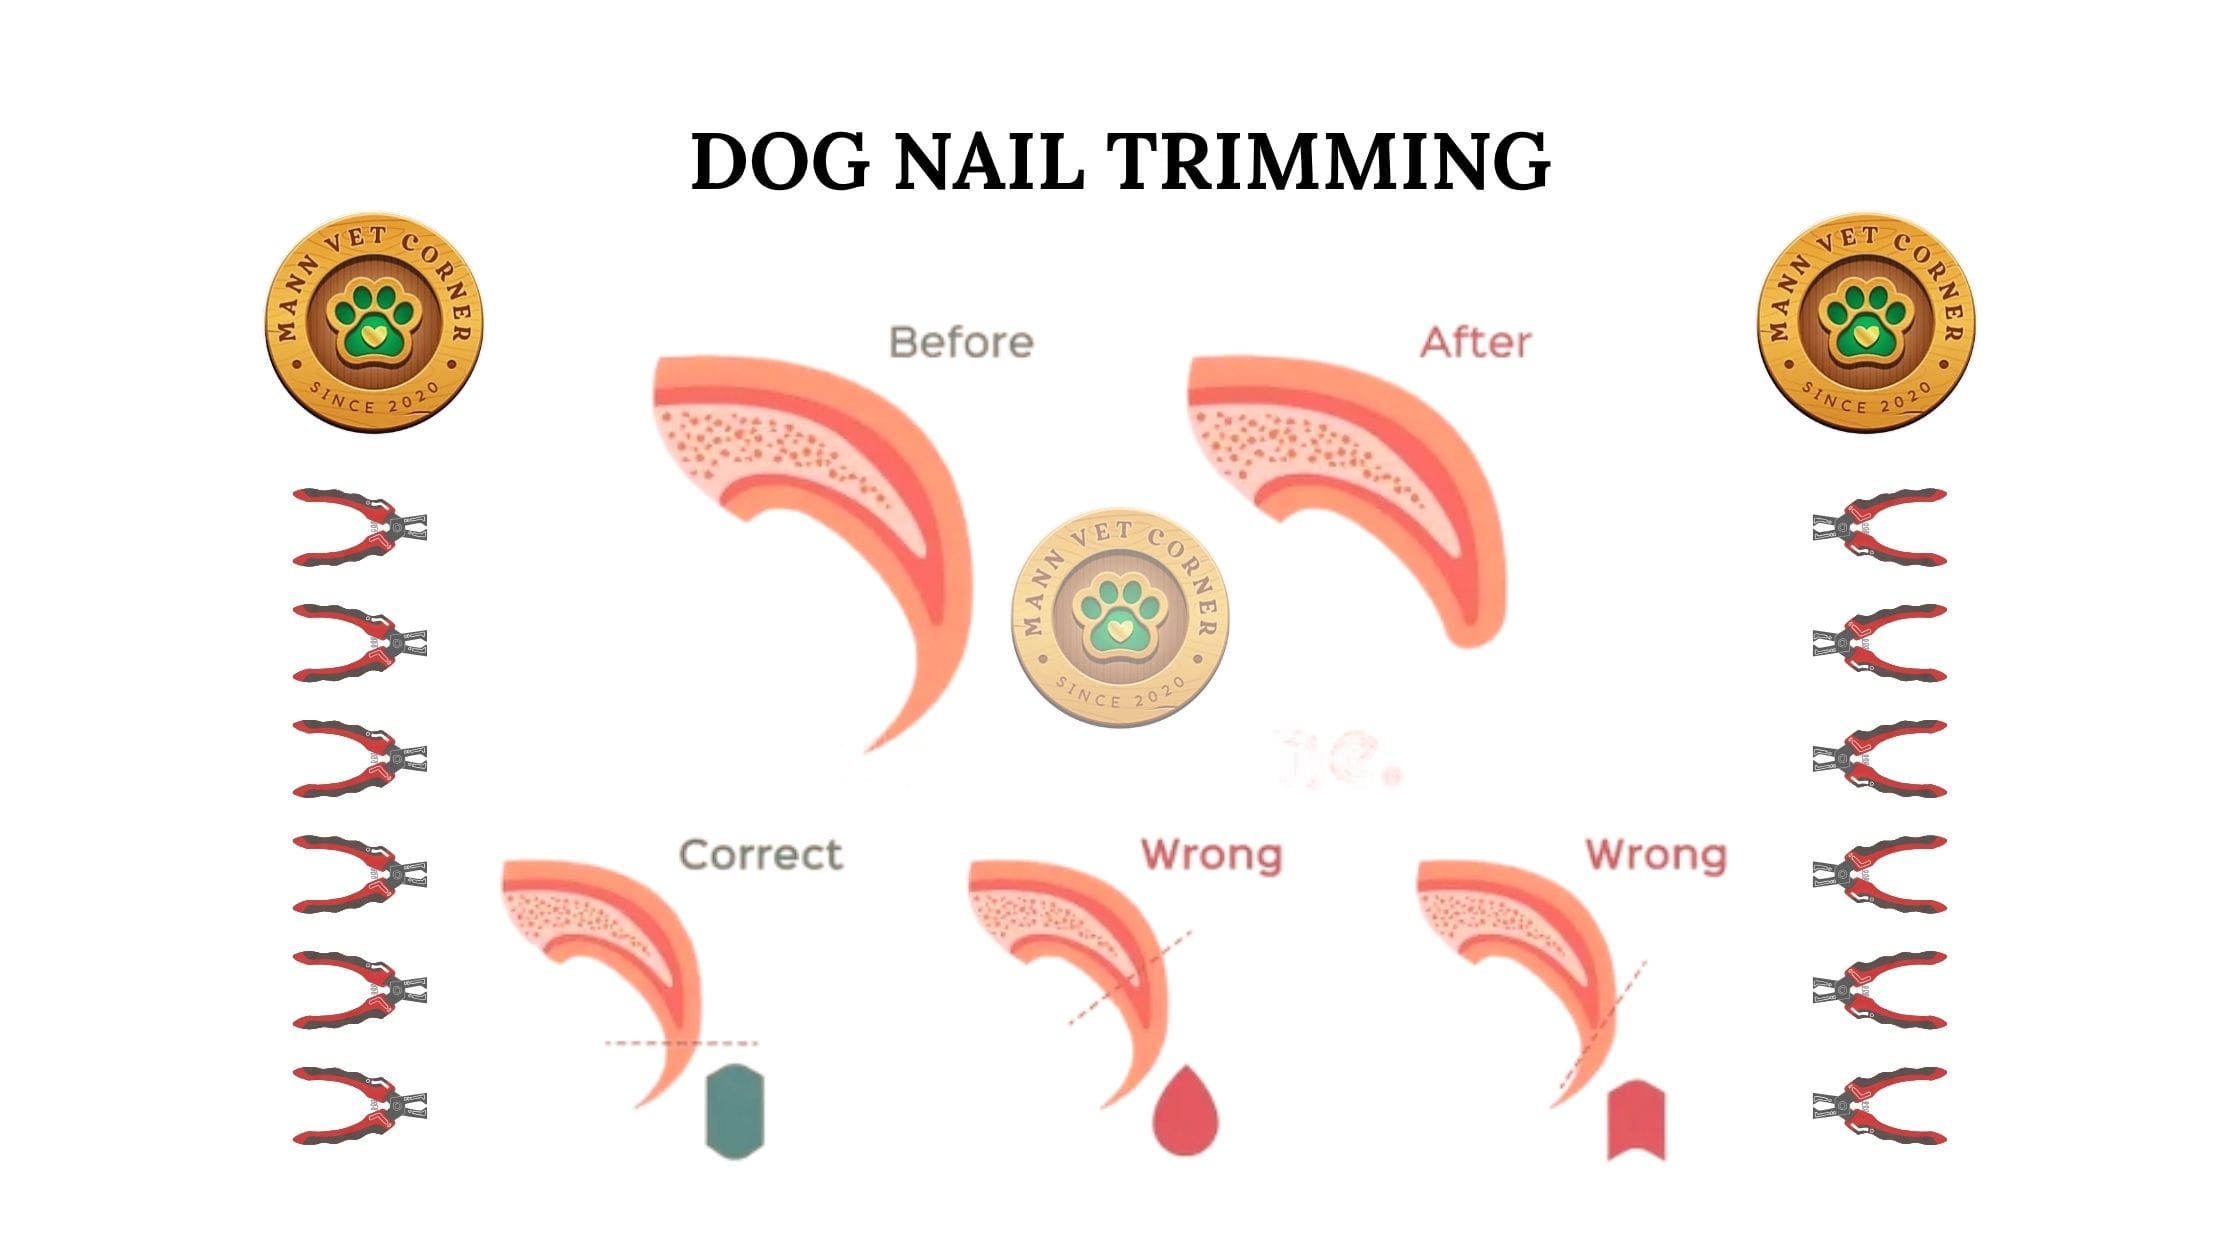
Look for the pink area inside the nail. Trim approximately 2-3mm before the quick, cutting at a 45-degree angle that follows the natural curve of the nail.
For Dark or Black Nails:
Since you cannot see the quick, adopt an extremely cautious approach. Trim only 1mm (about 1/32 inch) at a time. After each small cut, examine the nail’s cross-section. When you see a small dark circle or oval in the center, stop immediately—you’re approaching the quick.
4. Make the Cut
Position the clipper blade perpendicular to the nail, not parallel. This prevents splitting. Apply firm, steady pressure for a clean cut rather than squeezing slowly, which can crush the nail. Work quickly but carefully through all nails, taking breaks if your dog becomes stressed.
5. Don’t Forget the Dewclaws
The dewclaw, located higher on the leg near the wrist area, grows faster than other nails since it doesn’t touch the ground. These nails are particularly prone to overgrowth and can curl into the paw pad if neglected.
6. Reward Generously
Offer treats after completing each paw, not just at the end. This helps your dog stay cooperative and builds positive associations with nail trimming for future sessions.
Emergency First Aid: How to Stop Dog Nail Bleeding Fast
Even experienced dog owners occasionally cut the quick. While it looks alarming and causes temporary pain, nail bleeding can be quickly controlled with proper technique.
⚠️ Immediate Action Steps
- Stay calm – Your dog will pick up on your anxiety
- Prevent licking – This worsens bleeding and delays clotting
- Apply styptic powder – Press a pea-sized amount directly onto the nail tip
- Hold pressure – Use gauze to apply gentle pressure for 2-3 minutes
- Check clotting – Bleeding should stop within 5 minutes
When to Use Each Bleeding Control Method
Best Method: Styptic Powder
This specialized powder contains ferric subsulfate or silver nitrate, which promotes rapid clotting. Press the powder firmly onto the bleeding nail tip and hold for 30-60 seconds. The powder causes a mild stinging sensation but works within 2-3 minutes.
Alternative: Cornstarch or Flour
Pack the powdered substance directly onto the bleeding nail, then apply pressure with gauze. This method takes slightly longer (3-5 minutes) but works reliably for minor bleeding.
Bar Soap Method
Press the bleeding nail directly into a bar of soap, pushing hard enough to embed the nail. The soap’s ingredients help seal the blood vessel. Hold for 2-3 minutes before checking.
Treating Broken, Split, or Cracked Dog Nails
Nail injuries beyond simple trimming accidents require different treatment approaches depending on severity.
Minor Splits and Cracks
Small splits that don’t expose the quick can often be trimmed away, similar to removing a hangnail. Clean the area with warm water, dry thoroughly, and carefully trim the damaged portion with sharp clippers. Monitor for signs of infection over the next few days.
Broken Nails Exposing the Quick
When a nail breaks off and exposes the quick, follow these steps:
- Clean the injury gently with warm water or saline solution
- Apply styptic powder to control bleeding
- Use gauze and gentle pressure until clotting occurs
- Prevent licking with a recovery cone if necessary
- Apply a light bandage using non-stick telfa pads
- Monitor for increased pain, swelling, or discharge
Completely Torn Off Nails
When a nail is completely ripped from the toe, the exposed quick remains vulnerable to infection. While you can provide initial first aid at home, veterinary examination is strongly recommended to assess for bone trauma, prescribe antibiotics if needed, and provide appropriate pain medication.
- Bleeding doesn’t stop after 10 minutes of pressure
- The nail is split down to the base
- Your dog shows extreme pain when you touch the area
- Swelling, redness, or discharge develops within 24-48 hours
- Your dog refuses to put weight on the affected paw
- Multiple nails are affected (may indicate underlying health issues)
Common Nail Trimming Mistakes to Avoid
Using Dull or Inappropriate Clippers
Old, dull clippers crush rather than cut the nail, causing pain and increasing the risk of splitting. Replace clippers when they become dull, and always use clippers sized appropriately for your dog’s breed.
Cutting Too Much at Once
The “just get it over with” approach leads to more injuries. Take your time, trim small amounts, and err on the side of caution, especially with dark nails.
Inconsistent Trimming Schedule
When you wait too long between trims, the quick grows longer, making it progressively harder to keep nails short without bleeding. Regular weekly or biweekly trimming actually trains the quick to recede over time.
Ignoring Your Dog’s Stress Signals
If your dog pulls away, pants heavily, or shows signs of severe stress, stop and try again later. Forcing the issue can create lasting anxiety around nail trimming and make future sessions increasingly difficult.
Professional Tips for Dogs with Black Nails
Black nails present unique challenges since the quick remains invisible throughout the trimming process. Experienced groomers use these advanced techniques:
The Gradual Approach
Trim just 1mm at a time, examining the nail’s cross-section after each cut. Fresh cuts appear white and chalky. As you approach the quick, you’ll notice a dark gray or black circle appearing in the center. Stop immediately when you see this indicator.
The Flashlight Method
For thin black nails, shine a bright flashlight or phone light behind the nail. The quick may cast a faint shadow, giving you a general idea of where it ends.
Weekly Micro-Trims
Instead of attempting major cuts monthly, trim tiny amounts weekly. This gentle approach trains the quick to recede gradually while minimizing bleeding risk. Within 4-6 weeks of weekly trimming, you’ll notice the quick shortening significantly.
Preventing Nail Injuries: Long-Term Maintenance
Proper preventive care reduces the likelihood of broken nails, overgrowth, and trimming accidents.
Establish a Regular Trimming Schedule
Most dogs benefit from nail trimming every 3-4 weeks. Active dogs who walk frequently on concrete may need less frequent trims, while less active dogs may require more frequent attention. If you hear clicking sounds when your dog walks on hard floors, the nails are too long.
Provide Proper Nutrition
Feed high-quality dog food containing essential fatty acids, biotin, and zinc to support healthy nail growth. Brittle, weak nails that crack easily may indicate nutritional deficiencies.
Regular Paw Inspections
Check your dog’s paws weekly for signs of problems including nail discoloration, swelling around the nail bed, ingrown nails, excessive brittleness, or unusual odors that might indicate infection.
Keep Paws Clean
Regularly bathe your dog and clean between the paw pads. Dirt and debris trapped around nails can introduce bacteria that lead to infections, especially if a nail becomes cracked or broken.
Frequently Asked Questions About Dog Nail Clipping and Bleeding
How do I stop my dog’s nail from bleeding immediately?
Apply styptic powder directly to the bleeding nail tip, pressing firmly for 30-60 seconds. If styptic powder isn’t available, use cornstarch, flour, or press the nail into a bar of soap. Apply gentle pressure with clean gauze for 2-3 minutes. Most bleeding stops within 5 minutes using these methods.
How often should I trim my dog’s nails?
Trim your dog’s nails every 3-4 weeks to prevent overgrowth. For optimal nail health, weekly trimming of small amounts helps train the quick to recede over time. The ideal nail length allows a small gap between the nail and ground when your dog stands naturally.
What happens if I cut my dog’s quick?
Cutting the quick causes pain and bleeding because it contains blood vessels and nerves. While painful in the moment, the nail typically heals within a few days with proper care. Apply styptic powder immediately, prevent licking, and monitor for signs of infection. The injury itself is not dangerous, though excessive bleeding requires veterinary attention.
Can I file my dog’s nails instead of clipping?
Yes, filing or grinding with a pet nail grinder (Dremel-style tool) offers more control and reduces the risk of cutting the quick. However, grinding takes longer and some dogs dislike the vibration and noise. Introduce grinding gradually with positive reinforcement for best results.
Why are my dog’s nails bleeding without injury?
Spontaneous nail bleeding without obvious trauma may indicate nail infections, immune-mediated diseases, clotting disorders, or nail bed tumors. Any unexplained bleeding, especially affecting multiple nails, requires prompt veterinary evaluation.
How do I know if my dog’s nail injury needs a vet?
Seek veterinary care if bleeding continues beyond 10 minutes, the nail is split to the base, severe pain persists, swelling or discharge develops, or your dog refuses to bear weight on the affected paw. Nail injuries that expose bone or involve the dewclaw’s soft tissue attachment also warrant professional examination.
Building Confidence: Making Nail Trimming a Positive Experience
Many dogs fear nail trimming due to past negative experiences. Transform nail trimming from a dreaded ordeal into a tolerable, even enjoyable, routine with these behavioral techniques.
Desensitization Training
Start by simply handling your dog’s paws during calm moments, offering treats for cooperation. Gradually introduce the sound of clippers clicking near (but not on) the nails. Over several sessions, progress to touching nails with the clippers before attempting any cuts. This patient approach prevents anxiety and creates positive associations.
Counter-Conditioning
Pair nail trimming with your dog’s absolute favorite rewards—special treats, favorite toys, or extra playtime. Some dogs respond well to having another person feed a continuous stream of treats or peanut butter from a lick mat during the entire trimming session, redirecting attention from the nail care.
The “One Nail” Method
For extremely anxious dogs, trim just one nail per day rather than all nails in one session. While this extends the process, it prevents overwhelming your dog and builds tolerance gradually. Within a few weeks, you can usually increase to multiple nails per session.
When to Seek Professional Help
Sometimes, despite your best efforts, professional grooming or veterinary intervention becomes necessary.
Professional Grooming Services
If your dog’s anxiety remains severe despite training, or if you lack confidence in your technique, professional groomers offer nail trimming services typically ranging from ten to thirty dollars. Many veterinary clinics also provide nail trimming during regular visits.
Veterinary Sedation
For dogs with extreme fear or aggression around nail trimming, veterinarians can provide light sedation to make the process safer and less stressful. While not ideal for routine maintenance, this option prevents injury to both dog and handler in difficult cases.
Behavioral Consultation
If nail trimming triggers severe anxiety, panic attacks, or aggressive responses, consult a veterinary behaviorist. Underlying anxiety disorders may require medication or specialized behavior modification plans beyond standard desensitization techniques.
Advanced Scenarios: Special Circumstances
Nail Infections (Paronychia)
Nail bed infections develop when bacteria enter through cracks, breaks, or overgrown nails. Symptoms include swelling, redness, discharge, discoloration, and excessive licking. Nail infections require veterinary treatment with antibiotics. Never attempt to trim infected nails at home, as this can spread infection to the bone.
Ingrown Nails
Severely overgrown nails can curl and grow into the paw pad, causing pain and infection. If you notice your dog suddenly limping or favoring a paw, check for ingrown nails. Veterinary removal is recommended for embedded nails to prevent tissue damage.
Nail Bed Tumors
Unusual growths, persistent bleeding from a single nail, nail loss without trauma, or nail bed swelling may indicate tumors such as squamous cell carcinoma or melanoma. Any persistent nail abnormality lasting more than two weeks requires veterinary examination and possibly biopsy.
Lupoid Onychodystrophy
This immune-mediated condition causes multiple nails to become brittle, split, and fall off repeatedly. Dogs experience pain and recurrent nail loss affecting several toes. Diagnosis requires veterinary examination, and treatment involves immunosuppressive medications and specialized nail care.
🎯 Master Dog Nail Care Today
Regular nail maintenance is essential for your dog’s comfort, mobility, and overall health. With the right tools, technique, and patience, you can safely trim your dog’s nails at home and handle bleeding emergencies confidently.
Remember: Consistency matters more than perfection. Even if you occasionally cut the quick, continuing regular nail care prevents the painful overgrowth that causes far more discomfort than minor trimming accidents.
Conclusion: Empowering Pet Parents with Safe Nail Care
Learning how to clip dog nails and stop bleeding from broken nails empowers you to provide essential grooming care while strengthening the bond with your dog. While the process may seem intimidating initially, following veterinarian-approved techniques and maintaining a regular schedule makes nail trimming increasingly easier for both you and your pet.
Keep quality nail clippers, styptic powder, and treats readily available for routine maintenance and unexpected emergencies. Remember that most nail injuries can be safely managed at home with proper first aid, though severe trauma always warrants professional veterinary evaluation.
By prioritizing regular nail maintenance, you prevent painful overgrowth, reduce injury risk, and contribute significantly to your dog’s comfort and quality of life. The investment of time learning proper technique pays dividends in your dog’s long-term health and wellbeing.
📋 Quick Reference Checklist
- ✅ Trim nails every 3-4 weeks (or weekly for optimal quick recession)
- ✅ Always have styptic powder on hand before starting
- ✅ For dark nails, trim only 1mm at a time
- ✅ Use sharp, appropriate-sized clippers
- ✅ Reward your dog generously throughout the process
- ✅ If bleeding occurs, apply pressure for 2-3 minutes
- ✅ Contact vet if bleeding continues beyond 10 minutes
- ✅ Monitor nail injuries for signs of infection